Magento 2, Magento Development, Customization, Extension Development and Integration, Optimization, SEO and Responsive Design

Magento 2, Magento Development, Customization, Extension Development and Integration, Optimization, SEO and Responsive Design

How to Get Product Custom Option In Product Listing Page in Magento


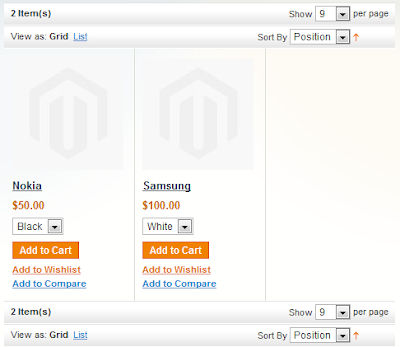
Using this post you can set your product custom option on product listing page. If you want to show available product custom option on you product listing page or category page to your customer, you can easily do using this post. 

You can set your custom options like color, size etc. to your product listing page or category page. You can also add your product to cart with selected option from list page. For that you just need to change in your list.phtml file of your current THEME. There is no need to change in your php file. 

Our module is also available on magento connect for free. You can download here.
Check our latest module  Product Custom Option (Pro)

How to Get Product Custom Option In Product Listing Page in Magento

Add following code in your list.phtml after <?php $i=0; $h=0; foreach ($_productCollection as $_product): ?> line:

<?php
     //$productSku = $_product->getSku();
     //$product = Mage::getModel('catalog/product');
     //$productId = $product->getIdBySku( $productSku );
     $product = Mage::getModel("catalog/product")->load($_product->getId());
     $attVal = $product->getOptions();
     $optStr = "";
?>

Replace <div class="actions"> with following code in same page.

<div class="actions">
<?php if($_product->isSaleable()):?>
 <form action="<?php echo $this->helper('checkout/cart')->getAddUrl($_product)?>" method="post" id= "product_addtocart_form" <?php if($_product->getOptions()):?> enctype="multipart/form-data"<?php endif;?>>
<div style='float: left; width: 100px;'>
 <?php foreach($attVal as $optionKey => $optionVal)
{
     $optStr.= "<select style='display:block; clear:both;' name='options[".$optionVal->getId()."]'>";           foreach($optionVal->getValues() as $valuesKey => $valuesVal)
{
      $optStr.= "<option value='".$valuesVal->getId()."'>".$valuesVal->getTitle()."</option>";
}
$optStr.= "</select>";
}
echo($optStr );?>

 <!--Change click action in button -->
 <button type="button" title="<?php echo $this->__('Add to Cart') ?>" class="button btn-cart" onclick="this.form.submit();"><span><span><?php echo $this->__('Add to Cart') ?></span></span></button>
</div>
<?php else:?>
     <p class="availability out-of-stock"><span><?php echo $this->__('Out of stock')?></span></p>
 <?php endif;?>
<ul class="add-to-links">
<?php if ($this->helper('wishlist')->isAllow()) :?>
<li>
     <a href="<?php echo $this->helper('wishlist')->getAddUrl($_product)?>" class="link-wishlist">
            <?php echo $this->__('Add to Wishlist')?>
     </a>
</li>
<?php endif;?>
<?php if($_compareUrl=$this->getAddToCompareUrl($_product)):?>
<li>
     <span class="separator">|</span>
     <a href="<?php echo $_compareUrl?>" class="link-compare"><?php echo $this->__('Add to     Compare')?>
     </a>
</li>
<?php endif;?>
</ul>
 </form>
 </div>

I would love to hear from you about this post!


Get Configurable Product SKU and Its Simple Product SKU in Cart Page Magento

Put this code at templet/checkout/cart/item/default.phtml after this line "$_item = $this->getItem();"

<?php
echo $temp = $_item->getProductId();
echo "<br/>";
$_product = Mage::getModel('catalog/product')->load($temp);
echo "Config. Product :";
echo $_product->getSku();
echo "<br/>";

echo "Simple Product :";
echo $_item->getSku();
?>


Magento get selected simple product id of configurable product on Product details page


Using my this solution you can get simple product Id of configurable product on product details page.

Here is simple function how to achieve that with no code modification.
Just one Javascript file and layout update.

configurable product


How are we going to pre-select configurable attributes? The selection of the attributes is controlled by the spConfig Javascript object. If you supply it with propertydefaultValues then the script will automatically select respective items in the option drop-down lists.

Paste the following code in app/design/frontend/default/[your theme]/template/catalog/product/view/type/options/configurable.phtml in side the script

spConfig.getIdOfSelectedProduct = function()
{
var existingProducts = new Object();
for(var i=this.settings.length-1;i>=0;i--)
{
var selected = this.settings[i].options[this.settings[i].selectedIndex];
if(selected.config)
{
for(var iproducts=0;iproducts<selected.config.products.length;iproducts++)
{
var usedAsKey = selected.config.products[iproducts]+"";
if(existingProducts[usedAsKey]==undefined)
{
existingProducts[usedAsKey]=1;
}
else
{
existingProducts[usedAsKey]=existingProducts[usedAsKey]+1;
}
}
}
}
for (var keyValue in existingProducts)
{
for ( var keyValueInner in existingProducts)
{
if(Number(existingProducts[keyValueInner])<Number(existingProducts[keyValue]))
{
delete existingProducts[keyValueInner];
}
}
}
var sizeOfExistingProducts=0;
var currentSimpleProductId = "";
for ( var keyValue in existingProducts)
{
currentSimpleProductId = keyValue;
sizeOfExistingProducts=sizeOfExistingProducts+1
}
if(sizeOfExistingProducts==1)
{
alert("Selected product is: "+currentSimpleProductId)
}

}

Now add onchange event to your dropdown in same page :

onchange="spConfig.getIdOfSelectedProduct()"

your dropdown's html looks like this...


<select name="super_attribute[<?php echo $_attribute->getAttributeId() ?>]" id="attribute<?php echo $_attribute->getAttributeId() ?>" class="required-entry super-attribute-select" onchange="spConfig.getIdOfSelectedProduct()">
        <option><?php echo $this->__('Choose an Option...') ?></option>
 </select>

Now you will get simple product id of your selected configurable product in alert box. So now you can get any details of your simple product using this product id.

Update: Click here if you want to download my module for getting all product details of selected simple product.


How to Move sidebar cart To Header Magento

Moving Mini-cart to header in magento is really simple you just need to change your xml and you are done with it. below are steps by which we can move mini cart.

Step1. Open checkout.xml from location given below

/design/frontend/default/[your theme]/layout/checkout.xml

find the code below in file.

<block type="checkout/cart_sidebar" name="cart_sidebar" template="checkout/cart/sidebar.phtml"/>

Step2. now open page.xml can be found at location given below

\design\frontend\default\[your theme]\layout\page.xml

in this file find the code given below

<block type="page/html_header" name="header" as="header">

paste the the cart_sidebar block as shown below.

<block type="page/html_header" name="header" as="header">
    <block type="page/template_links" name="top.links" as="topLinks"/>
    <block type="page/switch" name="store_language" as="store_language" template="page/switch/languages.phtml"/>
    <block type="core/text_list" name="top.menu" as="topMenu" translate="label">
    <label>Navigation Bar</label>

    <!--new added block -->
<block type="checkout/cart_sidebar" name="cart_sidebar" template="checkout/cart/sidebar.phtml"/>
    <!--end new block -->
    <block type="page/html_topmenu" name="catalog.topnav" template="page/html/topmenu.phtml"/>
</block>

Clear your cache.
Thats its............

Hit like or leave comment if post help!

Enable Template Path Hint in Magento Admin


If you wan to enable Template path hint in your magento admin than follow this easy step. You just need to add query to your database. You also need to run this query again to disable path hint.

Go to your Database and Just run this query:

INSERT INTO core_config_data (scope, scope_id, path, value)
VALUES ('default', 0, 'dev/debug/template_hints', 1),
('default', 0, 'dev/debug/template_hints_blocks', 1);

To disable them again, run this query:
UPDATE core_config_data set value = 0 where scope = 'default' and scope_id = 0 and path ='dev/debug/template_hints'
To enable again run this query:
UPDATE core_config_data set value = 1 where scope = 'default' and scope_id = 0 and path ='dev/debug/template_hints'


You can enable Template Path Hints in your magento front as well. Follow this post if you want to enable it.

How to Display Product on Home page

set the following code in your cms home page.

I'm going to display 7th number category's products on my home page. You can change for which categories
product you want to show on home page.

{{block type="catalog/product_list" category_id="7" template="catalog/product/list.phtml"  columnCount="3"}}


Set Dropdown Option value by name using jQuery


jQuery("#option_id").find("option:contains('Monday')").each(function()
{
if( jQuery(this).text() == 'Monday' )
{
jQuery(this).attr("selected","selected");
 }
});

How to Add new columns in order Grid Magento

You can Add new columns in order Grid Magento

protected function _prepareCollection()
    {
   
  $collection = Mage::getResourceModel($this->_getCollectionClass())
        ->join(
        'sales/order_item',
        '`sales/order_item`.order_id=`main_table`.entity_id',
        array(
            'skus'  => new Zend_Db_Expr('group_concat(`sales/order_item`.product_id SEPARATOR ",")'),

            'names' => new Zend_Db_Expr('group_concat(`sales/order_item`.name SEPARATOR ",")'),
            'quantities' => new Zend_Db_Expr('group_concat(`sales/order_item`.qty_ordered SEPARATOR ",")'),
            )

 );


 $collection->getSelect()->joinLeft(array('odtx1'=>'table_name'),'odtx1.product_id  = `sales/order_item`.product_id',array('odtx1.sale_name'));


 $collection->getSelect()->joinLeft(array('odtx2'=>' table_name '),'odtx2.vsaletitle  = odtx1.sale_name',array('odtx2.supplier_id'));
 $collection->getSelect()->joinLeft(array('odtx3'=>' table_name  '),'odtx3.supplier_id  = odtx2.supplier_id',array('odtx3.s_name'));


 $this->setCollection($collection);
$collection->getSelect()->group('entity_id');
return parent::_prepareCollection();
    }

Email Validation with valid Host name in Magento

$value = $_REQUEST['id'];

 $validator = new Zend_Validate_EmailAddress();
             
 if ($validator->isValid($value))
{
          echo "Valid";
 }
 else
{
        echo "Invalid";
 }


How to Import Database using command prompt

Import Database in WAMP:

mysql -u username -p database_name <  your_sql_file.sql

Import Database in XAMPP:

D:\xampp\mysql\bin\mysql.exe -u root -p db_name < D:\your_sql_file.sql


Copyright @ 2017 HKBlog.